Theme Setup
Thanks for purchasing the Evo Pro Theme! This tutorial will walk you through setting up the theme.
- Pre-Installation Setup
- Theme Installation
- Primary Menu
- Social Menu
- Social Share
- Logo
- How to setup the Home Page
- Featured Categories
- Sidebars
- The Customizer
Pre-Installation Setup
Compatibility:
Make sure your WordPress Installation is current. While this theme will work with older versions of WordPress, it is still best practice to keep your WordPress Installation up to date. This provides the greatest compatibilty and any added security features the WordPress Team might have added.
Theme Installation
Once you have completed the pre-installation steps and you’ve downloaded the theme zip file to your local computer, you are ready to install the Evo Pro theme.
Via the WordPress Dashboard:
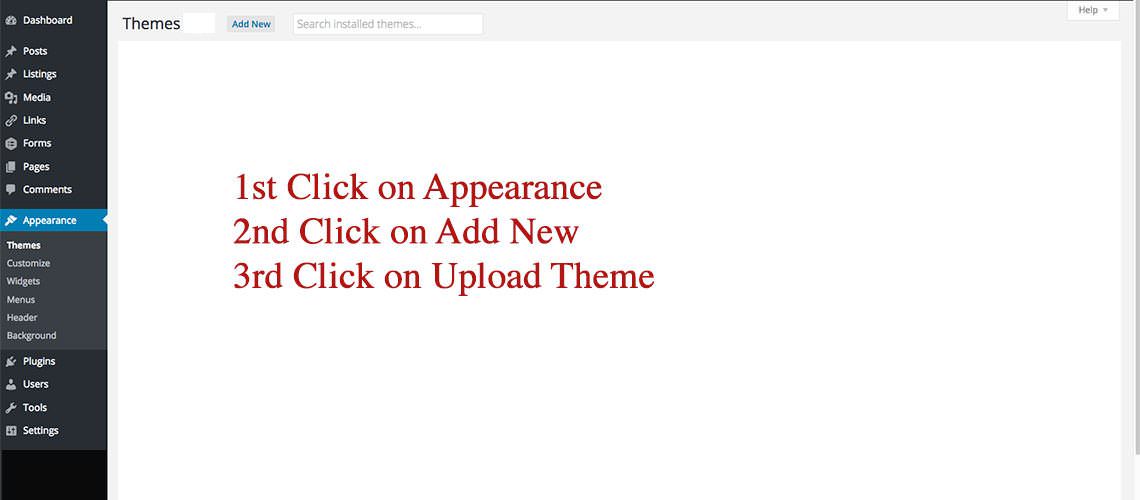
- Go to Appearance -> Themes -> Add New
- Use the Upload button and then the Browse button to locate the theme zip file on your local computer.
- Click Install Now and Activate the Theme
Via FTP or SFTp
- Unzip the theme zip file. You’ll see the theme folder labeled ‘Evo Pro’
- Upload the theme folder via FTP or SFTP to your wp-content/themes directory.
- Go to your WordPress admin dashboard and select Appearance
- Activate Evo Pro Theme
Primary Menu
The primary menu is the fixed nav menu on the top of the page.
- Go to Appearance -> Menus -> Create a new menu
- Name your menu Primary
- Add the pages you want to view in your main nav bar and then Add to Menu
- Check the Menu Settings Theme Locations to Primary Menu
- Save Menu
Social Menu
The Social menu is located towards the bottom of the page and links to your various social media pages so people can follow and connect with you there.
- Go to Appearance -> Menus -> Create a new menu
- Name your menu Social Menu
- Add the links you want by clicking the Custom Links on the left and giving it the Link Text, then Add to Menu
- Check the Menu Settings Theme Locations to Social Menu
- Save Menu
Social Share
This is a different set of Social links from the ones mentioned above. This is so people can share your content with their friends on their networks. This will help you generate more readers to your website
- Go to Settings -> Social Share
- Check which Sites you want your readers to share to.
- Save Changes
Logo
If you prefer a Logo Image rather than a text based Site Title, you can use a small logo style image that displays in the upper left corner of the site.
- Navigate to Appearance > Header menu in your WordPress admin panel.
- Click “Browse” and Navigate to the image you would like to use for a Logo. Images of exactly 300 × 75 pixels will give the best results. Other sizes will be cropped in the upload process to create an image of the correct size.
- Click “Upload” to copy the image from your computer to your website.
- Be sure to click the “Save Settings” button to preserve your changes.
How to Configure the Home Page
You have 16 Widgetized areas that you can add to the front page from Sliders to Random Text. If you don’t want to have a customized home page and just want to stick to a blog style website then you also have that option.
For a customized Home Page or Blog
- Create two pages. One called Home and another called Blog. For SEO purposes, make sure to give each page a proper title and description
- Go to Settings -> Reading
- Front page displays check A static page
- Choose Home for the Front Page
- Choose Blog for the Blog Page
- Choose how many posts you want the Blog page to display
- Choose either Full Text or a Summary
- Save Changes
- Reverse the options if you want a typical Blog Style Homepage
Widget Areas:
- Go to Appearance > Widgets
- Full width 1 = Edge To Edge of the screen
- Full width 2 = Is a full width centered area
- Full width 3 = Is a full width centered area
- Half width 1 = Goes with Half width 2 and breaks up the content to fit half the page
- Half width 2 = Goes with Half width 1 and breaks up the content to fit half the page
- One Third width 1 = Goes with One Third width 2 and 3 and breaks up the content to fit one third the page
- One Third width 2 = Goes with One Third width 1 and 3 and breaks up the content to fit one third the page
- One Third width 3 = Goes with One Third width 1 and 2 and breaks up the content to fit one third the page
- Footer Left = 1/3 width
- Footer Middle = 1/3 width
- Footer Right = 1/3 width
Featured Categories
One of the cool features that Evo Pro Provides is the ability to display Articles from any group of Categories you might have on your website. Basically you should decide what type of Categories you would want on your site and then create your Blog Posts for those specific Categories.
For instance, let’s say you have a Lifestyle Blog and wanted to have various categories like Work, Life, Travel, Family, Shopping, Eating etc. You would create those categories and add your posts.
- Go to Appearance > Widgets
- On the left hand side you will find the Evo Pro Categories Widget
- Choose which widget area you want to display the Featured Category
- Give the section a title
- Choose the Evo Image Size
- Decide how many articles you want displayed
- Choose the Category you want displayed
- Check the Split into Columns Box for a Grid Layout. Supports up to 6 columns
- Choose how many Columns
- Then Save and check out your new Featured Categories area.
- Note: you can have more than one Category featured on a page. Just repeat the process and add another Widget.
- Note: Articles should only be in one Category.
Sidebars
You have two sidebar options Left and Right and these are for the page or blog sidebars. They are also in the widgets area and you can follow the steps above.
The Customizer
We have built in support for the theme customizer. There you can choose different colors for your background, header, footer, links etc. It gives you a lot of ways to change the look of your site so you can make it look different.
- Go to Appearance > Customize
- You can change the Site Title there
- Upload your Logo
- Change Colors
- Change your text for the Latest from the Blog or Connect with us section
Conclusion:
Hopefully the documentation was helpful. This was a brief overview of Evo Pro and how to set it up.